Visioで複数のコネクタを並べていると、
「この折れ曲がり位置だけ、まとめて少し動かしたい…!」
ってなることありませんか?
でも1本ずつ直すの、地味にしんどいですよね。
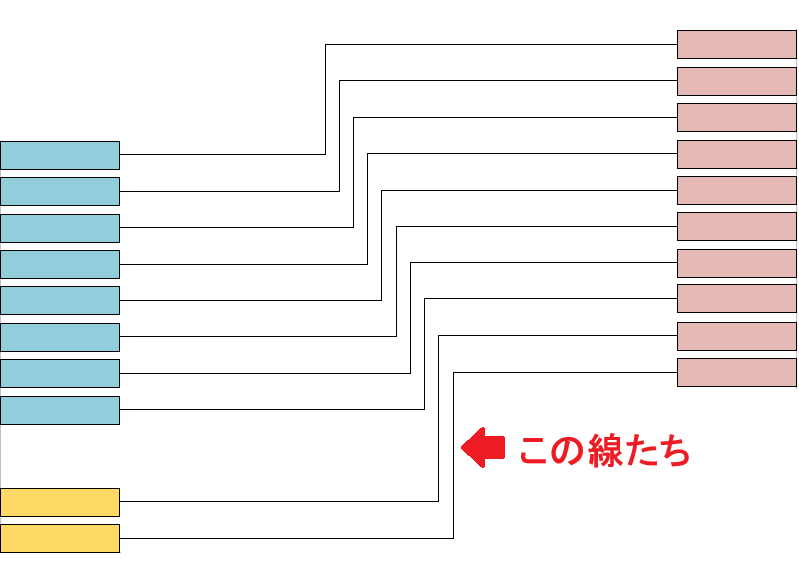
並んでいるコネクタ、1本ずつ動かすのが面倒なんだよね・・・
じゃあまとめて動かすコードを作ろう!
今回は、基準にした線の動きを他のコネクタにも反映して、複数の折れ曲がりをまとめて動かせるVBAを紹介します😊
このマクロの使い方
このマクロの使い方
- コネクタを複数選択して実行
※最初に選ばれた線が「基準線」になります - 基準線が赤くなります
- 動かしたい曲がり角にマウスを合わせてドラッグ
- ドラッグした分だけ、他の線も一斉に移動します
※ 同じ形状のコネクタのみ対応
※ 向きが逆・頂点数が違う場合は動かないことがあります。
処理の考え方(ざっくり)
やっていることはシンプル👇
まず、最初に選んだ線を「基準線」にします。
この線の動きを、他の線にも反映させます。
ドラッグ中は、マウスの位置そのものではなく
前回からどれだけ動いたか(差分) を取得しています。
そして、その動いた分を他のコネクタにもそのまま足しています。
つまり、
基準線の動きを、そのまま他の線にコピーしている
だけです。
難しい計算はしていません。
“動いた量”を再利用しているだけなので、自然な動きになります。
マウスイベントが便利だった!
「ドラッグっぽい動き」をVBAで再現するためにWithEventを使ったよ。
WithEvent???
そう、マウスの動きを拾えるようにマウスイベントを作って、そこから“差分”を計算しているんだ!
今回のマクロはマウスの動きから差分を取るのがPoint!ということでマウスの動きを認識するためにWithEventを使って、マウスイベントを図面上で使えるようにしました。
WithEventsの記事はここにあるので、読んでいただけると嬉しいです😊

サンプルコード
以下のVBAコードを使えば、線の束を同時に移動できます。
標準モジュールとThisDocumentにコードを貼り付けて下さい。
よし!貼り付けだっ!
標準モジュール
' --- 標準モジュールにコピペ ---
Public gSelection As Visio.Selection ' 選択されたコネクタたち
Public gBaseShape As Visio.Shape      ' 判定基準にする1本
Public gHighlightLine As Visio.Shape  ' オレンジのハイライト線
Public gIsDragging As Boolean          ' ドラッグ中フラグ
Public gSegIndex As Long               ' 何番目の線分か
Public gStartX As Double, gStartY As Double ' ドラッグ開始位置
Public gOriginalColor As String
Public gOriginalWeight As String

' --- 起動マクロ ---
Public Sub StartDragSegmentMode()
    Set ThisDocument.app = Visio.Application

    ' 選択されている図形をセット
    Set gSelection = ActiveWindow.Selection

    If gSelection.Count = 0 Then
        MsgBox "コネクタをいくつか選んでから実行してね!"
        Exit Sub
    End If

    ' 判定の基準は、便宜上1番目の図形にする
    Set gBaseShape = gSelection(1)

  ' 元の状態を保存
    gOriginalColor = gBaseShape.CellsU("LineColor").FormulaU
    gOriginalWeight = gBaseShape.CellsU("LineWeight").FormulaU

  ' 1. 基準線の色を変える
    gBaseShape.CellsU("LineColor").FormulaU = "RGB(255,0,0)"

    ' 2. ここで選択を解除!ハンドルを消してハイライトを見やすくする
    ActiveWindow.DeselectAll

    gIsDragging = False
    gSegIndex = 0
    Debug.Print "Multi-Mode Start: " & gSelection.Count & " shapes selected."
End Sub
' --- セグメント判定(XYToPageでズレ防止) ---
Function GetSegmentIndex(shp As Visio.Shape, mx As Double, my As Double, tol As Double) As Long
    Dim i As Integer, rowCount As Integer
    Dim px1 As Double, py1 As Double, px2 As Double, py2 As Double
    Dim minDist As Double: minDist = tol / 25.4

    rowCount = shp.rowCount(visSectionFirstComponent)

    ' 2行目から (最後-1) 行目までをループ対象にする
    ' これで端点のセグメントを無視
    For i = 2 To rowCount - 2
        shp.XYToPage shp.CellsU("Geometry1.X" & i).ResultIU, shp.CellsU("Geometry1.Y" & i).ResultIU, px1, py1
        shp.XYToPage shp.CellsU("Geometry1.X" & i + 1).ResultIU, shp.CellsU("Geometry1.Y" & i + 1).ResultIU, px2, py2

        If DistancePointToLine(mx, my, px1, py1, px2, py2) < minDist Then
            GetSegmentIndex = i
            Exit Function
        End If
    Next i
    GetSegmentIndex = 0
End Function

' --- オレンジ線の描画更新 ---
Sub UpdateHighlightSegment(shp As Visio.Shape, segIdx As Long)
    Dim px1 As Double, py1 As Double, px2 As Double, py2 As Double

    shp.XYToPage shp.CellsU("Geometry1.X" & segIdx).ResultIU, shp.CellsU("Geometry1.Y" & segIdx).ResultIU, px1, py1
    shp.XYToPage shp.CellsU("Geometry1.X" & segIdx + 1).ResultIU, shp.CellsU("Geometry1.Y" & segIdx + 1).ResultIU, px2, py2

    If gHighlightLine Is Nothing Then
        Set gHighlightLine = ActivePage.DrawLine(px1, py1, px2, py2)
        gHighlightLine.CellsU("LineColor").FormulaU = "RGB(255,165,0)"
        gHighlightLine.CellsU("LineWeight").FormulaU = "3pt"
        ' --- マウスに邪魔させない設定 ---
        ' 1: 選択不可、0: ヒットテスト無効
        gHighlightLine.CellsU("SelectMode").ResultIU = 1

    Else
        gHighlightLine.CellsU("BeginX").ResultIU = px1
        gHighlightLine.CellsU("BeginY").ResultIU = py1
        gHighlightLine.CellsU("EndX").ResultIU = px2
        gHighlightLine.CellsU("EndY").ResultIU = py2
    End If
End Sub

' --- ドラッグ変形(PageToXYで座標変換) ---
Sub DragSegment(mx As Double, my As Double)
    If gSegIndex = 0 Or gBaseShape Is Nothing Then Exit Sub

    Dim dx As Double, dy As Double
    Dim shp As Visio.Shape
    Dim x1 As Double, y1 As Double, x2 As Double, y2 As Double

    ' セグメントの向きを判定するために座標を取得
    x1 = gBaseShape.CellsU("Geometry1.X" & gSegIndex).ResultIU
    y1 = gBaseShape.CellsU("Geometry1.Y" & gSegIndex).ResultIU
    x2 = gBaseShape.CellsU("Geometry1.X" & gSegIndex + 1).ResultIU
    y2 = gBaseShape.CellsU("Geometry1.Y" & gSegIndex + 1).ResultIU

    ' 移動量を計算
    dx = mx - gStartX
    dy = my - gStartY

    For Each shp In gSelection
        ' 横線(Yがほぼ同じ)なら垂直移動、それ以外(縦線など)なら水平移動
        If Abs(y2 - y1) < 0.001 Then
            ' --- 垂直ドラッグ(Y座標を更新) ---
            shp.CellsU("Geometry1.Y" & gSegIndex).ResultIU = shp.CellsU("Geometry1.Y" & gSegIndex).ResultIU + dy
            shp.CellsU("Geometry1.Y" & gSegIndex + 1).ResultIU = shp.CellsU("Geometry1.Y" & gSegIndex + 1).ResultIU + dy
        Else
            ' --- 水平ドラッグ(X座標を更新) ---
            shp.CellsU("Geometry1.X" & gSegIndex).ResultIU = shp.CellsU("Geometry1.X" & gSegIndex).ResultIU + dx
            shp.CellsU("Geometry1.X" & gSegIndex + 1).ResultIU = shp.CellsU("Geometry1.X" & gSegIndex + 1).ResultIU + dx
        End If
    Next shp

    ' 次の移動量計算のために座標を更新
    gStartX = mx
    gStartY = my

    UpdateHighlightSegment gBaseShape, gSegIndex
End Sub
' --- お掃除 ---
' A: セグメントの「印」だけを消す(MouseMove用)
Public Sub ClearSegmentHighlight()
    If Not gHighlightLine Is Nothing Then
        On Error Resume Next
        gHighlightLine.Delete
        On Error GoTo 0
        Set gHighlightLine = Nothing
    End If
End Sub

' B: 基準線の「色」を元に戻す(MouseUp用)
Public Sub ClearBaseHighlight()
    If Not gBaseShape Is Nothing And gOriginalColor <> "" Then
        gBaseShape.CellsU("LineColor").FormulaU = gOriginalColor
        gBaseShape.CellsU("LineWeight").FormulaU = gOriginalWeight
        gOriginalColor = ""
    End If
End Sub

' --- 距離計算 ---
Function DistancePointToLine(px As Double, py As Double, x1 As Double, y1 As Double, x2 As Double, y2 As Double) As Double
    Dim L2 As Double
    L2 = (x2 - x1) ^ 2 + (y2 - y1) ^ 2
    If L2 = 0 Then DistancePointToLine = Sqr((px - x1) ^ 2 + (py - y1) ^ 2): Exit Function
    DistancePointToLine = Abs((y2 - y1) * px - (x2 - x1) * py + x2 * y1 - y2 * x1) / Sqr(L2)
End Function
ThisDocument
' --- ThisDocumentにコピペ ---
Public WithEvents app As Visio.Application

' マウスを押した:ドラッグ開始
Private Sub app_MouseDown(ByVal Button As Long, ByVal KeyButtonState As Long, ByVal x As Double, ByVal y As Double, CancelDefault As Boolean)
    If gSegIndex > 0 Then
        gIsDragging = True
        gStartX = x ' 開始位置を記録
        gStartY = y

        ' Visioの標準動作(図形の移動など)をキャンセルして、VBAに専念させる
        CancelDefault = True

        Debug.Print "Drag Start & Standard Action Cancelled"
    End If


End Sub

' マウスを動かした:ハイライト or 変形
Private Sub app_MouseMove(ByVal Button As Long, ByVal KeyButtonState As Long, ByVal x As Double, ByVal y As Double, CancelDefault As Boolean)
    If gBaseShape Is Nothing Then Exit Sub

    ' --- 1. ドラッグ中なら移動だけして即終了! ---
    If gIsDragging Then
        DragSegment x, y
        Exit Sub
    End If

    ' --- 2. ホバー中(ドラッグしてない時)だけ判定する ---
    Dim currentSeg As Long
    currentSeg = GetSegmentIndex(gBaseShape, x, y, 2)

    If currentSeg > 0 Then
        If currentSeg <> gSegIndex Then
            gSegIndex = currentSeg
            UpdateHighlightSegment gBaseShape, gSegIndex
        End If
    Else
        ' 線から離れた時だけリセット
        gSegIndex = 0
        ClearSegmentHighlight
    End If
End Sub

' マウスを離した:ドラッグ終了
Private Sub app_MouseUp(ByVal Button As Long, ByVal KeyButtonState As Long, ByVal x As Double, ByVal y As Double, CancelDefault As Boolean)
    If gIsDragging Then
        ' 1. ドラッグフラグを下ろす
        gIsDragging = False

        ' 2. オレンジの線を消し、基準線の色もどす
        ClearBaseHighlight
        ClearSegmentHighlight

        ' 3. 参照をクリアして実行モードを完全に終了する
        Set gBaseShape = Nothing
        Set gSelection = Nothing
        gSegIndex = 0

        Debug.Print "MouseUp: Operation Finished."

        ' 4. イベント監視も終了したい場合はこれ(必要に応じて)
        Set app = Nothing
    End If

End Sub
まとめ:イベント × 実用コードは強い
いかがでしたか?
このマクロ、地味だけどめちゃくちゃ実用的です。
何本も並んだコネクタを1本ずつ直すストレスから解放されます。
しかもやっていることは「動いた量(差分)をコピーしているだけ」。
仕組みはシンプルなのに、体感はかなり快適です。
そして今回のポイントは、
WithEventsでマウスの動きを拾ったこと。
イベントを使うと、VBAでも“操作している感覚”を作れます。
ぜひコピペして、あなたの図面でも試してみてください😊