テキストボックス同士をコネクタで結びたいんだけど・・・
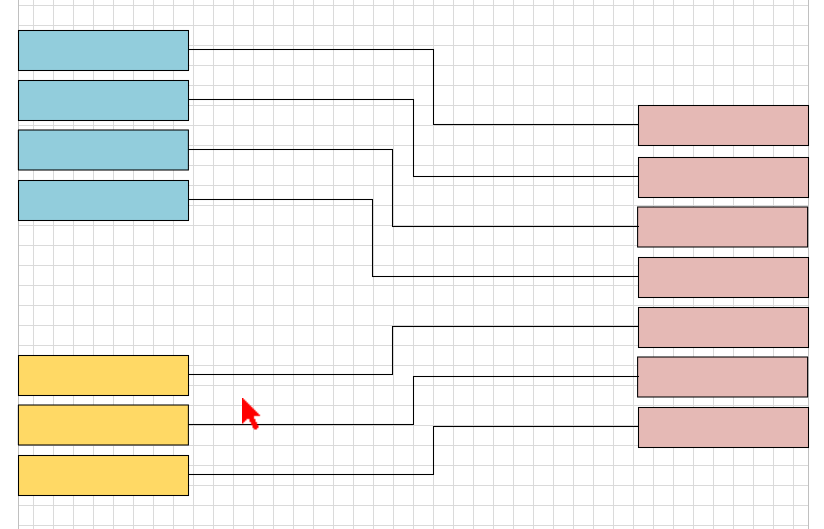
例えばこんな感じ・・・
今回は自動でコネクタをつなぐ方法を考えてみよう!
Visioで配線図を描くとき、線をたくさん引くのに時間がかかって「うーん…」ってなったことありませんか?
例えば、ブロック図にテキストやシェイプを並べたとします。
普通なら、自分でコネクタを選んで「ここからここへ…」と線を引きますよね。
でも同じような線を10本、20本となると面倒ですよね。そこで自動配線!、ちょっとしたVBAコードでシェイプ同士をいい感じにつないでくれるようにしました。
使い方などなど
まず、使い方はこんな感じ。
このすぐ後に説明するユーザーフォームを使って
①開始位置のテキストボックスを選んだらBeginボタンをクリック
②終了位置のテキストボックスを選んだらEndボタンをクリック
③Connectボタンをクリックする
と選択したテキストの同士が上から順に線がつながります。
テキストボックスは複数選択可、上にあるテキストから順番につながるようにしてあります。
前提条件として、
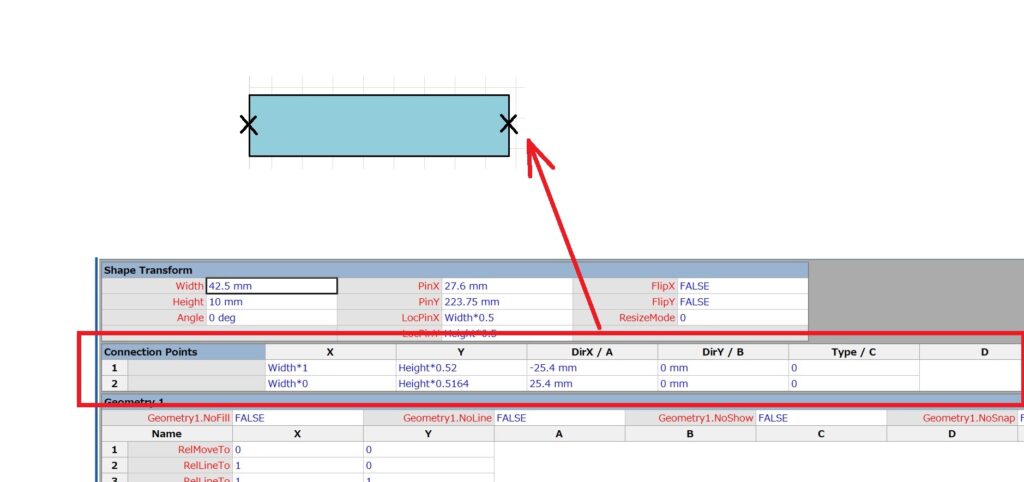
テキストの左右にコネクションポイントを設置しています。
シェイプシートで見るとこんな感じで、左が1,右が2になっています。
コネクションポイントについては以下の記事も参照ください。

ユーザーフォームを生成
ユーザーフォームってなんだ?
ユーザーフォームって何?と言う方はこちらの「まずユーザーフォームを生成」を参照ください。

今回のユーザーフォームはこんな感じ
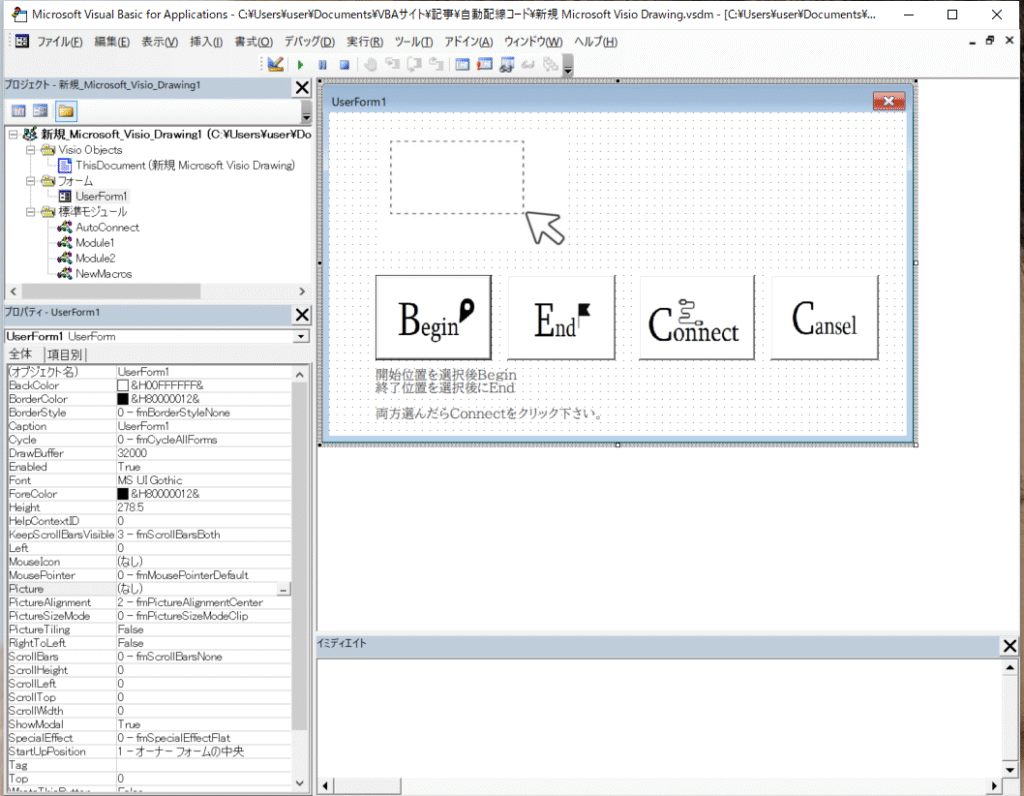
コマンドボタンを3つ配置します。左から
CommandButton_Begin
CommandButton_End
CommandButton_Connect
CommandButton_Cansel
※参考画像のUserForm1はプロパティPictureのところに画像を貼ってます。
Sample Code
まずはフォームを表示するコード、その下がユーザーフォームのコードになります。
さっき作った4つのボタンのクリックイベントを書いています。
コード
面倒な方はベタっと全部貼ってください。
そして、結果のところまですっとばして下さい。
フォームはモードレスモードで表示します。
ユーザーフォームをモーダルで表示すると、フォームを開いたままページを操作することができます。
今回はシェイプを選択したいので、モードレスを指定。
Sub AutoConnect()

   UserForm1.Show vbModelessl

End Sub
ユーザーフォームのコード
    Dim shapeArray_B() As Visio.Shape
    Dim shapeArray_E() As Visio.Shape
    Dim shapeArray_C(100) As Visio.Shape
    Dim sel As Visio.Selection
    Dim sel_Bcnt, sel_Ecnt As Integer
    Private Declare PtrSafe Sub Sleep Lib "kernel32" (ByVal dwMilliseconds As LongPtr)


Private Sub CommandButton_Begin_Click()

    Dim sel As Visio.Selection
    Dim i As Integer, j As Integer


    ' 選択図形を取得
    Set sel = ActiveWindow.Selection
    If sel.Count = 0 Then Exit Sub

    ' 配列に格納
    Call GetSelectedShapesToArray(sel, shapeArray_B)
    sel_Bcnt = UBound(shapeArray_B)


    ' --- バブルソートでY座標降順に並べ替え(上→下) ---
    Call BubbleSort(sel_Bcnt, shapeArray_B)

    '選択解除
    ActiveWindow.DeselectAll


End Sub

Private Sub CommandButton_End_Click()

    Dim sel As Visio.Selection
    Dim i As Integer, j As Integer
    Dim tmp As Visio.Shape


    ' 選択図形を取得
    Set sel = ActiveWindow.Selection
    If sel.Count = 0 Then Exit Sub

    ' 配列に格納
    Call GetSelectedShapesToArray(sel, shapeArray_E)
    sel_Ecnt = UBound(shapeArray_E)

    ' --- バブルソートでY座標降順に並べ替え(上→下) ---
    Call BubbleSort(sel_Ecnt, shapeArray_E)

    ActiveWindow.DeselectAll


End Sub

Sub GetSelectedShapesToArray(sel, shapeArray)

    If sel.Count = 0 Then
        MsgBox "図形が選択されていません。"
        Exit Sub
    End If

    ' 配列サイズを選択数分確保
    ReDim shapeArray(1 To sel.Count)

    ' 選択中の図形を配列に格納
    For i = 1 To sel.Count
        Set shapeArray(i) = sel.Item(i)
    Next i

End Sub

Sub BubbleSort(selCount, shapeArray)

    Dim tmp As Visio.Shape

    ' --- バブルソートでY座標降順に並べ替え(上→下) ---
    For i = 1 To selCount
        For j = i + 1 To selCount
            If shapeArray(i).Cells("PinY") < shapeArray(j).Cells("PinY") Then
                Set tmp = shapeArray(i)
                Set shapeArray(i) = shapeArray(j)
                Set shapeArray(j) = tmp
            End If
        Next j
    Next i

End Sub

Private Sub CommandButton_Connect_Click()

    Dim sh1 As Visio.Shape
    Dim sh2 As Visio.Shape
    Dim shpC As Visio.Shape
    Dim LineCnt As Integer


    If (sel_Bcnt <> sel_Ecnt) Then
        MsgBox "開始位置と終了位置の数が一致しません"
        Exit Sub
    End If


    ' 接続する図形
    For i = 1 To sel_Bcnt

    Set sh1 = shapeArray_B(i)  ' 例: 図形1
    Set sh2 = shapeArray_E(i)  ' 例: 図形2

    ' コネクタをドロップ(コネクタ形状をページに配置)
    Set shpC = ActivePage.Drop(Application.Documents.Item("Visioファイルのパス\新規 Microsoft Visio Drawing.vsdm").Masters.ItemU("Dynamic connector"), 0, 0)
    shpC.CellsSRC(visSectionObject, visRowShapeLayout, visSLOConFixedCode).FormulaU = "2"
    shpC.CellsSRC(visSectionObject, visRowShapeLayout, visSLOJumpCode).FormulaU = "1"

    ' コネクタを接続ポイントに接続(Connections.X1を使用)
    shpC.Cells("BeginX").GlueTo sh1.Cells("Connections.X1")  ' Shape1の接続ポイント
    shpC.Cells("EndX").GlueTo sh2.CellsU("Connections.X2")    ' Shape2の接続ポイント

    ' 曲げ位置を変更
    If sh1.Cells("PinY") > sh2.Cells("PinY") Then
        LineCnt = i
    Else
        LineCnt = (sel_Bcnt - i + 1)
    End If

    Sleep 100 ' 10ミリ秒待つ
    DoEvents

    shpC.CellsSRC(visSectionFirstComponent, 2, 0).FormulaU = "int(GUARD(EndX-BeginX)/0.2) * 0.2 / 2 -" & Str(Int(LineCnt - sel_Bcnt / 2) * 0.2)
'    shpC.CellsSRC(visSectionFirstComponent, 2, 0).FormulaU = "int(GUARD(EndX-BeginX)/0.2) * 0.2 / 2 "
'    shpC.CellsSRC(visSectionFirstComponent, 2, 0).FormulaU = Str(Int(LineCnt - sel_Bcnt / 2) * 0.2)

    shpC.CellsSRC(visSectionFirstComponent, 2, 1).FormulaU = "0"
    shpC.CellsSRC(visSectionFirstComponent, 3, 0).FormulaU = "int(GUARD(EndX-BeginX)/0.2) * 0.2 / 2 -" & Str(Int(LineCnt - sel_Bcnt / 2) * 0.2)
    shpC.CellsSRC(visSectionFirstComponent, 3, 1).FormulaU = "GUARD(EndY-BeginY)"

    Set shapeArray_C(i) = shpC

    Next

    ActiveWindow.DeselectAll


End Sub


Private Sub CommandButton_Cansel_Click()

  UserForm1.hide

End Sub
GetSelectedShapesToArrayモジュール
選択中の図形を配列にいれています。
For i = 1 To sel.Count
Set shapeArray(i) = sel.Item(i)
Next i
BubbleSort
そのあとBubbleSortでY座標が大きい順に並び変えます。
(BubbleSortはチャットGPTが教えてくれました)
仕組み
・これを配列の先頭から末尾まで繰り返す
・隣り合った要素を順番に比較する
・順番が逆だったら入れ替える
For i = 1 To selCount
For j = i + 1 To selCount
If shapeArray(i).Cells(“PinY”) < shapeArray(j).Cells(“PinY”) Then
Set tmp = shapeArray(i)
Set shapeArray(i) = shapeArray(j)
Set shapeArray(j) = tmp
End If
Next j
Next i
CommandButton_Connect_Click
コネクタをDropした後のこの2行は、コネクタを配置する前に他の線と重なって自動で位置が変わってしまうのを防ぐためにロックしています。
shpC.CellsSRC(visSectionObject, visRowShapeLayout, visSLOConFixedCode).FormulaU = “2”
shpC.CellsSRC(visSectionObject, visRowShapeLayout, visSLOJumpCode).FormulaU = “1”
曲げ位置を変更の部分は
コネクタの真ん中から両側に0.2インチずつ間を空けて曲げ位置がくるようにしています。
shpC.CellsSRC(visSectionFirstComponent, 2, 0).FormulaU = “int(GUARD(EndX-BeginX)/0.2) * 0.2 / 2 -” & Str(Int(LineCnt – sel_Bcnt / 2) * 0.2)
‘ shpC.CellsSRC(visSectionFirstComponent, 2, 0).FormulaU = “int(GUARD(EndX-BeginX)/0.2) * 0.2 / 2 “
‘ shpC.CellsSRC(visSectionFirstComponent, 2, 0).FormulaU = Str(Int(LineCnt – sel_Bcnt / 2) * 0.2)
shpC.CellsSRC(visSectionFirstComponent, 2, 1).FormulaU = “0”
shpC.CellsSRC(visSectionFirstComponent, 3, 0).FormulaU = “int(GUARD(EndX-BeginX)/0.2) * 0.2 / 2 -” & Str(Int(LineCnt – sel_Bcnt / 2) * 0.2)
shpC.CellsSRC(visSectionFirstComponent, 3, 1).FormulaU = “GUARD(EndY-BeginY)”
キャンセルボタン
UserForm1.hide
ユーザーフォームを非表示にします。
コネクタについてはこちらも参照ください。
結果
コネクトボタンをおすと~~~コネクタが接続されました!!!
一気に完了!
これでいっぱい線引かなくて良いね!